
Pages
-
WinterCampers.com
- Blog
- About WinterCampers.com
-
Guide To Winter Camping
- 01. An Introduction To Winter Camping
- 02. Why Go Winter Camping?
- 03. How To Start Winter Camping
- 04. Leave No Trace (LNT) For Winter Campers
- 05. Planning A Winter Camping Trip
- 06. Transportation
- 07. Winter Camping Shelters
- 08. Winter Clothing
- 09. Food And Fluids
- 10. Cooking
- 11. Sleeping Warm
- 12. Sanitation
- 14. Cold Injuries and Recognizing Hypothermia
- 15. Sample Gear List
- Wilderness First Aid
- Links To Other Winter Camping Resources
-
Still Can’t Get Enough About Winter Camping?
-
Gear Reviews
- Beyond Clothing’s Cold Play Soft Shell Jacket
- Black Diamond Megamid
- Columbia Kazoo Hat
- Design Salt Cocoon Silk Mummyliner
- Ed’s Wilderness Systems Snow Clipper Pulk
- Eureka Kaycee 0º F Long Sleeping Bag
- Kifaru Tipi
- Magnesium Fire Starter
- New England OverShoes (NEOS) for Winter Camping
- Trail Stove by Stratus
- Western Mountaineering Puma Sleeping Bag
- Winter Camping Articles
- Winter Camping Recipes
- Winter Camping Tips
- Winter Camping Video
-
Gear Reviews
- The Entertaining Side of Winter Camping
-
Trip Log and Photos
- 1999.12 Indian Pass…The “I Am Not Going To Lie To You” Trip
- 2001-01 Tirrell Pond
- 2004-02 Dogsledding in Ely,MN
- 2008-04 Tenant Creek Falls
- 2009-01 Dead Vly
- 2009-02 Cascade Pond
- 2010-10 Mitchell Ponds
- 2010-12 Noonmark Mountain
- 2011-01 Bennett Lake
- 2011-04 Jockeybush Lake
- The Lighter Side of Winter Camping
Planning A Winter Camping Trip
When planning a winter camping trip,especially if snow camping,remember that travel will be much slower than in the summer. Reduce your mileage goal by 50% to 60%. Daylight hours are fewer in the winter,which will also limit your time. Normal activities around camp take longer in cold weather.
Think about when to take your winter camping trip:
- November Moderate temperatures,possible rain,thin snow cover
- December Short days and long nights,thin snow cover
- January Good snow cover,long nights,extreme temperatures
- February Good snow cover,long nights,extreme temperatures
- March Longer days, milder temperatures,adequate snow
- April Spotty snow cover,warm temperatures,longer days
Plan Ahead and Prepare
Poor planning often results in miserable campers and damage to natural and cultural resources. Trip planning is important as it:
- It helps ensure the safety of groups and individuals.
- It prepares you to Leave No Trace and minimizes resource damage.
- It contributes to accomplishing trip goals safely and enjoyably.
- It increases self-confidence and opportunities for learning more about nature.
Elements to consider when planning a trip
- Identify and record the goals (expectations) of your trip. Is this a ‘jamboree’ or are members of the group trying to accomplish specific goals.
- Identify the skill and ability of trip participants. Are there members of the group that are winter camping novices and if so,how will they be mentored?
- Select appropriate destinations that match your goals,skills,and abilities and plan trip activities to match your goals,skills,and abilities.
- Gain knowledge of the area you plan to visit from land managers,maps,and literature. Use trail guides and the internet to perform as much research as possible prior to the trip.
- Choose your equipment and clothing for comfort,safety,and Leave No Trace qualities.
- Evaluate your trip upon return to note changes you will make next time.
- Know the weather forecast in advance
- Understand the terrain you will be traveling. Bring maps and photos along to help locate your journey on the terrain.
- Understand any regulations/restrictions that may apply,including parking.
- Understand and respect private land boundaries
- Anticipate the average hiking speed of group and anticipated food consumption
- Plan to accommodate the group size. Does it meet regulations and trip purpose?
You can prepare by:
- Educating yourself on the area you plan to visit. Learn about winter regulations,closures,and weather hazards. In upstate New York,where I live,the DEC Regulations,(http://www.dec.ny.gov/regulations/regulations.html) specifically the DEC State Land Use Regulations,regulate where to camp on State Land. Tents may be set up at designated sites. Designated sites have yellow “Camp Here” discs with a black tipi,and your tent must be within 15 feet of this disc. Outside of designated sites,tents must be 150 feet from any trails or water. Lean-tos do not count as designated sites,so tents must be 150 feet from any lean-tos or trails leading to lean-tos as well. Designated sites will have a disc,so even if there is a fire ring but not a disc,the campsite is not a legal one unless it follows the 150 foot rule.
- Last but not least,obviously,you can’t camp at any site that has a “No Camping” disc.
- Taking a winter back country course to gain experience.
- Expect extreme weather and gear up for it.
- In mountainous country carry an avalanche beacon,probe,and shovel.
- Plan a route appropriate for the experience level,size,and goals of your group. In the Adirondack Park one can contact the NYS DEC at (518) 897-1200 to determine trail conditions in the area you plan to visit. Adirondack Trail Information can also be found on the DEC web site at:www.dec.ny.gov/outdoor/7865.html. The web pages provide general information and seasonal conditions, specific notices on closures and other situations involving trails,roads,foot bridges,etc.,and links to rules ®ulations,hiker and camper safety,low impact recreation,weather and more.
- Leave your excursion plans with two people,including your expected return time. They can begin a rescue if you do not return in reasonable time.
- Trail markings may be hidden in snow. Use a map and compass for navigation. Batteries in GPS units may not work in cold temperatures.
- Anticipate changing weather that may obscure or cover trail markings,tents,and gear. Make sure you know where you are and where your gear is at all times.
- Night falls early. You will have much less time to travel and set up camp,so plan accordingly and understand that everything takes longer in cold weather.
- Ensure you have appropriate gear for the worst-case environment. Use layering of clothes to keep warm and prevent overheating followed by freezing.
Weather Planning
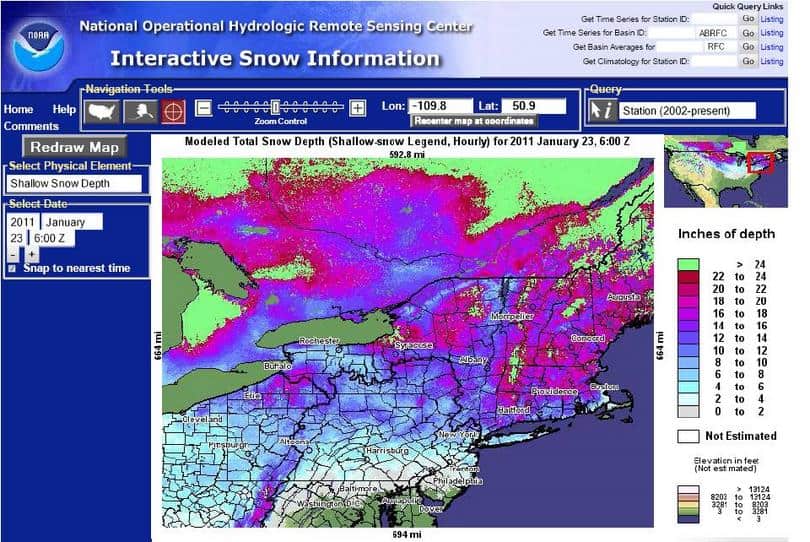
NOAA’s National Operational Hydrological Remote Sensing Center has an Interactive Snow Information Map for the US. It is a great mapping tool for analyzing snow cover. The map is highly configurable. You can re-center the map anywhere in the US. One can map Hourly Snow Analysis,Driving Conditions,and Daily Snow Analysis. You can look at historical data. One can select overlays to be plotted such as Hydrologic,Political,Point or Transportation features for reference purposes.

Group Size
Winter camping is more fun and a lot safer in group. Choose group members that will be compatible with one another. Group members should have similar expectations and goals.
Never explore alone,but keep groups small to minimize impact and keep the group operating efficiently.
A group of four allows one to stay with an injured person and two to go for help. A small group allows for specialties to emerge. One person might set the tent while others cut fireword wood,make a warm drink,or begin cooking.
The 10 Essentials
Before you take your trip there are essential items that should be included in your pack to ensure your comfort and survival – the famous 10 Essentials.
In the 1930s,the Mountaineers,a Seattle-based hiking,climbing,and conservation organization,came up with a list of 10 essential items that no climber should be without. Many outdoor training schools make use of the 10 essentials to teach outdoor skills and good practices. Since then the 10 essentials have been published by various groups to suit particular outdoor situations.
- Map – A map tells you a ridiculous amount of information that can be used in the back country. It tells you were you are,how far you have to go,time to get there,amount you have to climb,where to park your car,campsites,water sites,and an emergency route in an accident. We are positive that we left out 50 other things but you get the idea. If travelling on foot in the back country 7.5 minute USGS quads or 15 minute maps will give you the detail that you are starving for. Oh,you better know how to read it!
- Compass – Carry a compass at all times. Learn to use this tool,and its cousin the topo map,and you are on your way to finding that never done route to the never visited part of the forest. You can do all this in zero visibility of course since the compass doesn’t lie when the visibility goes to zilch. For all you GPS carriers out there,don’t even think a GPS is a replacement. Don’t trust anything with a battery in the backcountry.
- Flashlight Or Headlamp – A flashlight or headlamp should be carried at all times. You may need to walk in to your camp in the dark. Flashlights can also be used to signal for help from anybody that may be looking for you in a critical situation.
- Extra Food – Whenever you are outside have extra food in case you are delayed by bad weather,injuries,getting lost,or getting exhausted. The mountaineers of the 1930’s suggest a one-day supply of extra food. Extra food can boost morale,ward off hypothermia,and when things are bad give you that needed energy. Leave the low carb food at home,that’s for sissies.
- 5) Rain Gear And Extra Clothes – You need to have extra cloths and rain gear to deal with almost anything you can think of. Remember in the backcountry cotton kills. In addition to non cotton layers you would normally take while outside bring extra clothes. These extra clothes are critical when the conditions get real bad or you have to spend an extra night on the mountain. Remember that a good hat is the best weight per warmth ratio item in your backpack.
- Sunglasses And Sun Screen – Ever have snow blindness and sunburn at the same time? This becomes even more pronounced at higher elevations since the intensity of ultraviolet rays becomes more of a problem.
- First Aid Kit – Prepackaged first aid kits designed just for hikers are a great item to have. These packages contain band-aids,bandages,basic medicines,and many other items. Of course this is like the compass. If you don’t know how to use it,it won’t be of much use.
- Pocket Knife Or Multi Purpose Tool – A knife will allow you to perform various tasks in the back country. A few of them include lifesaving procedures such as cutting bandages,removing splinters,punching holes in tarps,cutting rope,making kindling,and putting a hole in your friends thermarest in the middle of the night.
- Fire starter And Matches – Fire is warmth and warmth is good when you are cold. Fire also serves as a good signal to others when you are lost. A basic fire starter is useful for starting a fire in emergency situations and for getting wet wood blazing. A fire starter can consist of a chemically-treated fire stick,candles,melted paraffin and newspaper,waxed cardboard,dryer lint,wood shavings,or hundreds of other materials. Clean out that belly button and save that lint! In addition to the fire starter carry waterproof and windproof matches. These will be essential in starting your fire starter when things go south.
- Water And A Way To Purify It – Without water your body will weaken and your muscles and organs just won’t be able to function. Water also fends off hypothermia and altitude sickness. Having a water purifier such as a commercial water filter or iodine tablets in addition to a good stove to melt or boil water can solve the problem.
Wired magazine published their list of 10 Essential Outdoor Survival Items. The table below depicts the difference between Wired’s list and WinterCampers.com. The Wired list does not place a premium on navigation as they do not include a map or compass on their list. I suppose the trash bag could double as rain gear.
| WinterCampers.com | Wired Magazine |
| Map | |
| Compass | |
| Flashlight | Flashlight |
| Extra Food | High Calorie Protein Bars |
| Rain gear &extra clothes | |
| Sunglasses &sun screen | |
| 1st Aid Kit | 1st Aid Kit |
| Knife or Multi-tool | Knife |
| Fire starter and matches | Butane Lighter &Tinder |
| Water and a way to purify it | Water purification supplies |
| whistle | |
| Plastic Trash Bag | |
| Backpacker Hammock | |
| Metal cup or can |
Another take on the 10 essentials is listed at Gotta Go – It Snows:Daypack List.
Backpacker Magazine has a short video called “Pack Like a Pro” where Jonathon Dorn describes items he packs on for day hikes.
Follow our occasional Tweets @WinterCampers

January 25th,2011 | Category:Cold Weather Camping,Winter Camping,Winter Camping Skills